
_0.jpg)
Photo Credit
Switchback Travel
Switchback Travel
Along with a harness and rope, one of the most essential pieces of rock climbing equipment is the belay device. In short, a belay device attaches the climber’s rope to the belayer, allowing the belayer to keep the rope taut, catch the climber when he or she falls, and lower them safely to the ground. But although it’s a necessity, purchasing a device can be extremely confusing—there are countless choices and an absolute imperative to use it correctly. Here, we share our top recommendations and cover the basics to help you find the right belay device for your needs with our buying advice and comparison table.
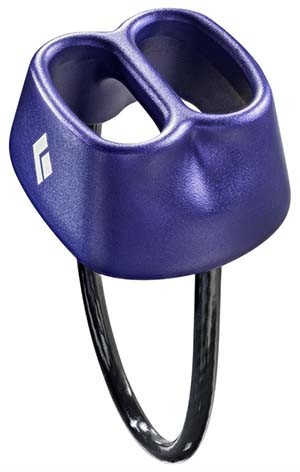 Black Diamond ATC ($22)
Style: Tube
What we like: Cheap, simple, durable, and easy to use.
What we don’t: To belay from above in a multi-pitch scenario, you’ll need to step up to a device like the ATC-Guide below.
See the Black Diamond ATC
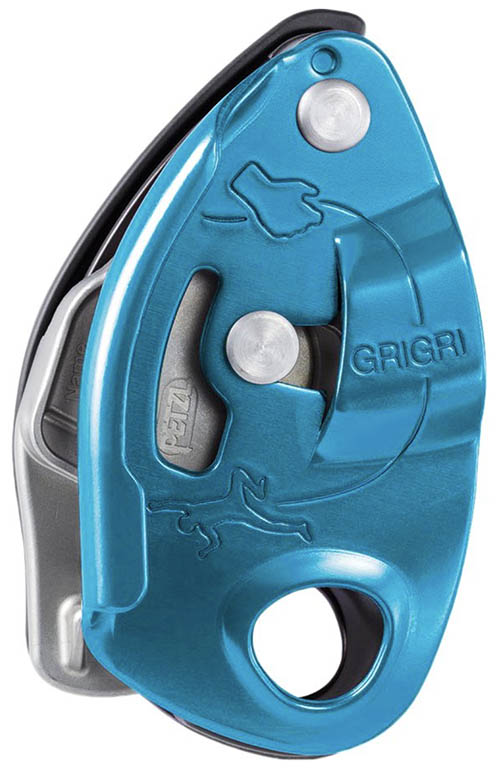 Petzl Grigri ($110)
Style: Assisted-braking
What we like: Assisted braking allows for a more secure belay.
What we don’t: Heavy, expensive, and requires a bit of a learning curve. Cannot be used for rappelling or double-rope setups.
See the Petzl Grigri
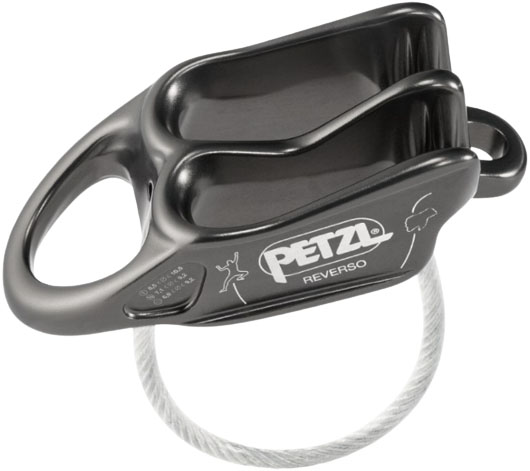 Petzl Reverso ($35)
Style: Auto-blocking tube
What we like: Lightweight, affordable, and allows you to belay from above in guide mode. Great for rappelling and double-rope setups.
What we don’t: Not as secure as the Grigri above.
See the Petzl Reverso
| Belay Device | Price | Category | Weight | # of Ropes | Rope Diameter |
|---|---|---|---|---|---|
| CAMP Ovo | $10 | Plate | 2 oz. | 2 | 8 - 11mm |
| Mad Rock Wingman | $14 | Tube | 2.4 oz. | 2 | 8 - 11mm |
| CAMP Shell | $20 | Tube | 1.8 oz. | 2 | 7.6 - 11mm |
| Black Diamond ATC | $22 | Tube | 2.1 oz. | 2 | 7.7 - 11mm |
| Petzl Verso | $25 | Tube | 1.9 oz. | 2 | 6.9 - 11mm |
| Black Diamond ATC-XP | $25 | Tube | 2.3 oz. | 2 | 7.7 - 11mm |
| Wild Country Pro Guide Lite | $30 | Auto-blocking tube | 2.7 oz. | 2 | 7.7 - 11mm |
| Black Diamond ATC-Guide | $35 | Auto-blocking tube | 2.8 oz. | 2 | 8.1 - 11mm |
| Black Diamond ATC-Alpine Guide | $35 | Auto-blocking tube | 2.6 oz. | 2 | 6.9 - 9mm |
| Petzl Reverso | $35 | Auto-blocking tube | 2 oz. | 2 | 6.9 - 10.5mm |
| DMM Pivot | $37 | Auto-blocking tube | 2.5 oz. | 2 | 7.3 - 11mm |
| Edelrid Micro Jul | $45 | Assisted (passive) | 2.2 oz. | 2 | 6.9 - 8.9mm |
| Mammut Smart 2.0 | $45 | Assisted (passive) | 2.8 oz. | 1 | 8.7 - 10.5mm |
| Edelrid Jul 2 | $46 | Assisted (passive) | 3.7 oz. | 1 | 8.9 - 11mm |
| Edelrid Mega Jul | $50 | Assisted (passive) | 2.3 oz. | 2 | 7.1 - 10mm |
| Black Diamond ATC-Pilot | $50 | Assisted (passive) | 3.3 oz. | 1 | 8.7 - 10.5mm |
| Edelrid Giga Jul | $60 | Assisted (passive) | 4.3 oz. | 2 | 7.1 – 10mm |
| Climbing Technology Click Up Plus | $100 | Assisted (passive) | 3.9 oz. | 1 | 8.5 - 11mm |
| Beal Birdie | $90 | Assisted (active) | 7.4 oz. | 1 | 8.5 - 10.5mm |
| Mad Rock Lifeguard | $99 | Assisted (active) | 5.4 oz. | 1 | 8.9 - 11mm |
| Trango Vergo | $100 | Assisted (active) | 6.8 oz. | 1 | 8.9 - 10.7mm |
| Petzl Grigri | $110 | Assisted (active) | 6.2 oz. | 1 | 8.5 - 11mm |
| Petzl Grigri + | $140 | Assisted (active) | 7.1 oz. | 1 | 8.5 - 11mm |
| Wild Country Revo | $145 | Assisted (active) | 10.1 oz. | 1 |
8.5 - 11mm |
| Edelrid Eddy | $150 | Assisted (active) | 12.7 oz. | 1 | 9 - 11mm |
| CAMP Matik | $220 | Assisted (active) | 9.7 oz. | 1 | 8.6 - 10.2mm |
Belay devices—no matter the design—all use friction (created by a bend in the rope) to hold tension and keep the climber from falling. But despite this major similarity, there are myriad options, each with its own set of strengths, limitations, and best uses. To keep it simple, we sort belay devices into four main categories: tube, auto-blocking tube, assisted-braking, and plate. Below we provide the necessary details for the four styles, including our top picks for each.
.jpg)
Tube
The most popular device for belaying is the tube device, commonly referred to as an “ATC” (this is Black Diamond’s name for their tube device, and akin to calling all tissues “Kleenex”). A tube device is typified by two simple slots and a loop—some of these slots will have teeth on one end, which help to add friction and provide a smoother belay or lower. Tube devices are relatively lightweight and inexpensive and can handle a wide range of rope sizes (for example, the Black Diamond ATC can be used with ropes 7.7 to 11mm). Additionally, they are able to accommodate two ropes for rappelling (in addition to standard belaying with a single rope). Many beginner climbers will start with a tube device—the Black Diamond ATC being one of our favorite budget options—but for $10 more, an auto-blocking tube device (see below) provides a huge bump in versatility.
.jpg)
Auto-Blocking Tube
An auto-blocking tube device has the same design as a standard tube device, but with an additional attachment point for belaying from the anchor. This technique is commonly referred to as “belaying in guide mode” (for more, see “Belaying a Follower” below). Auto-blocking tubes—also known as plaquettes—offer the same versatility as tube devices: they can handle a large range of rope diameters, have two slots for rappelling or belaying with double ropes, and are lightweight and inexpensive. In top rope and lead belaying scenarios, the two devices operate identically. But in a situation where the climber is being belayed from the top of the climb (common in multi-pitch climbing), the extra loop attaches the device to the anchor, allowing the leader to belay the follower more safely (the rope locks down on itself and assists in braking). An auto-blocking tube device is hands-down the best tool for belaying a follower up a multi-pitch climb, and we recommend it to any beginning climber interested in expanding their skill set to longer routes. Our favorites include the super-lightweight Petzl Reverso and the innovative DMM Pivot for its improved lowering abilities in guide mode.
.jpg)
Assisted-Braking
Assisted-braking devices are becoming increasingly popular, largely due to the amount of safety that they add to belaying and rappelling. The design of each device varies, but they all share a similar ability to lock down in the event of a fall (when the rope is weighted), thus aiding the belayer in holding the climber. There are two different types of assisted-braking devices: passive and active. Passive devices use their geometry (a sharp bend, for example) to lock the rope in place, as seen in the popular Edelrid Mega Jul and the Black Diamond ATC-Pilot. These devices are generally lighter and less expensive than active devices. Active devices—heavier and more expensive, but often easier to operate—have a moving part that engages in the event of a fall (which is then disengaged with a lever). One downside to active assisted-braking devices is that the camming unit places extra wear and tear on the rope. This is not a large consideration for most climbers, but certainly something to be aware of.
.jpg)
In general, assisted-braking devices are heavier and more expensive than tube-style devices, and most of them are only designed to operate with a single rope (the Mega Jul and Giga Jul are two key exceptions). Furthermore, some of these devices are not designed to safely belay the follower from above, as is common in multi-pitch climbing. Additionally, assisted-braking devices are more complicated to operate than tube-style devices, and each design comes with its own learning curve. But once mastered, an assisted-breaking device adds a level of assurance to belaying that we really love. These are our first choice for top rope and cragging scenarios, but are not as versatile as auto-blocking tube devices for multi-pitch climbing or rappelling.
We’d be remiss not to mention the hazards of using an assisted-braking device. Like we said, when used correctly, they offer the height of safety for belaying and rappelling. But when used incorrectly, the consequences can be dramatic. There are numerous documented instances of belayers loading their device backwards or opening the lever all the way when lowering their climber, too many of which did not end well. Don’t let your guard down when using an assisted-belay device, and always operate as per the manufacturer’s instructions.
.jpg)
Plate
Often used in canyoneering and rappelling-specific contexts, belay plates have a few uses for climbing, although most beginning climbers will opt for the tube-style and assisted-braking devices above. We recommend belay plates for one main purpose: belaying a follower (or two) from an anchor (as in a multi-pitch scenario). Modern plates are auto-blocking and are more lightweight and compact than tube, auto-blocking tube, and assisted-braking devices. However, take note that belay plates are not as versatile as other devices—they’re difficult to operate both for lead belaying and rappelling. But for ounce counters, they can provide a great substitute for heavier and bulkier devices (the CAMP Ovo is the most popular of this style).
.jpg)
In certain situations—such as climbing as a party of three, using twin ropes, and rappelling—you’ll need a belay device that can handle two ropes. The vast majority of tube-style devices and plates have this capability, but most assisted-braking devices are designed to handle just one rope (with the exception of the Edelrid Mega Jul and Giga Jul). If you’re climbing with two ropes, make sure you have the proper tool for the job.
In the vast majority of situations, you will need to rappel on a doubled-over rope (not a fixed line) in order to pull your rope once you’re down. This implies that you will need a device with two slots. That said, on multi-pitch climbs, it is common for a team to have one assisted-braking device (such as a Petzl Grigri) and a second auto-blocking tube or plate device to accommodate two ropes. In this scenario, the first climber will descend the rope—fixed at the halfway point—with the assisted-braking device, and the second will unfix the rope and descend with the tube or plate.
.jpg)
Most belay devices are made to handle a range of rope sizes, with tube-style (both standard and auto-blocking) and plate devices being the most versatile and assisted-braking devices having the smallest ranges. For example, the Petzl Verso can accommodate ropes 6.9 to 11 millimeters in diameter, while the Edelrid Eddy is limited to 9 to 11-millimeter lines. While it can be possible to operate a device with a rope smaller or larger than specified, it is not optimal and often compromises safety. As skinnier and skinner ropes hit the market, it’s very important make sure that your belay device safely pairs with your rope.
.jpg)
Without exception, you should always use a locking carabiner in tandem with a belay device. If you’re the type that likes to keep it simple, any locking carabiner will do the trick. That said, there are myriad options to choose from, and some do the job better than others. In this context, the main concern is cross-loading: you never want the carabiner to flip sideways on your harness, where the force begins pulling side-to-side rather than parallel with the spine. Carabiners like the Black Diamond GridLock, DMM Belay Master 2, and Edelrid HMS Bulletproof Screw FG all use slightly different technologies to ensure that this does not happen. Of course, it’s OK to belay with a standard locking carabiner, but be sure to keep your eyes on your device from time to time to make sure it is correctly situated.
.jpg)
As we mentioned in depth above, there are times (mainly in multi-pitch environments) when a climber will belay his or her partner from above. In this scenario, a climber leads a pitch, and—instead of lowering to the ground—builds an anchor and belays their partner up to them. Almost 100 percent of the time, the best setup for this sort of belay is an auto-blocking tube device secured to the anchor in guide mode. The belay is more ergonomic and less constraining (being that the device is not attached to the belayer’s harness), and when the climber falls or weights the rope, the climber strand locks down on the brake strand and prevents the rope from slipping. Plate devices also function well for top belaying, especially when you’re trying to cut weight and bulk. Finally, many assisted-braking devices can work for a top belay as well, but they add unnecessary heft and are generally less straightforward to use. And as is the case with all assisted-braking scenarios, belayers should be sure to keep one hand on the brake strand at all times.
.jpg)
When all else fails, there’s always the Munter hitch. In a situation where you drop or forget a belay device, a Munter hitch can be used for all belaying or rappelling scenarios: lead belaying, belaying a follower, top roping, and rappelling. Because this knot is not intuitive, puts a lot of wear on the carabiner, and causes the rope to kink, we don’t recommend it as an everyday replacement to a belay device. But in a pinch, the Munter hitch can be a lifesaver. As always, be sure to learn and practice this knot before heading out to the crag.
Back to Our Top Belay Device Picks Back to Our Belay Device Comparison Table
1de0.jpg?h=fbc67360&itok=ZEme7qNA "climbing (s)")
b409.jpg?h=fbc67360&itok=E5itqI_F)
_07f36.jpg?h=fbc67360&itok=WIH3d-nu)
8c98.jpg?h=fbc67360&itok=0T9p4IAC)
_049e4.jpg?h=fbc67360&itok=qBzD69RD)
_0f01d.jpg?h=fbc67360&itok=gWj0tVg5)
%20(s)7a19.jpg?h=fbc67360&itok=Iq4VmyM7)
_16cfd.jpg?h=fbc67360&itok=O49WLtlp)
_11029.jpg?h=10d202d3&itok=2OYVYX-H)